
Last step. You send the filter to your receiver, turn it on and check it sounds right.
Export the filter
Beginner
- On the Filter Export screen, select a slot. Most receivers have 3.
- Give the filter a name. Keep it to 20 characters or fewer, because receivers cut off longer names. Something like “Film 2026-09” or “Music flat”.
- Click Export Filter. When it’s done, Dirac returns to the Filter Design screen.
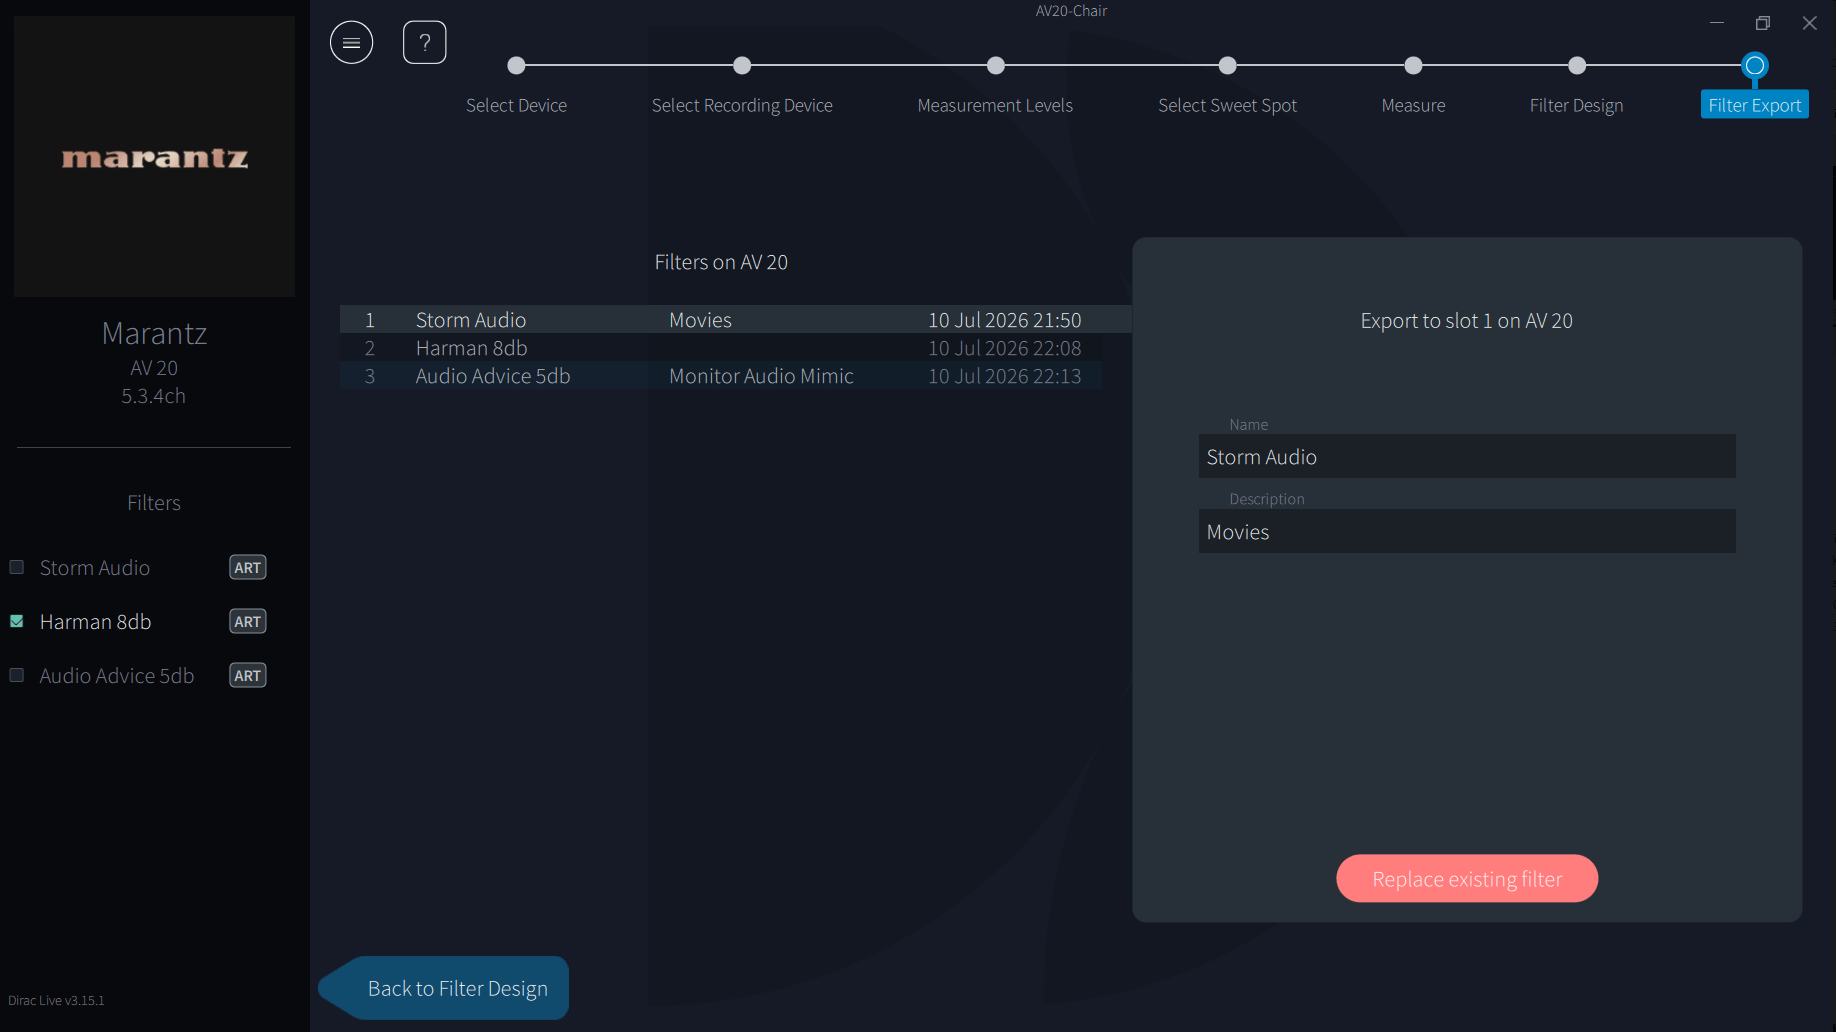
Save your project again now, from the menu. Without the project file you’d have to measure again to make any change.
Turn it on at the receiver
- Open your receiver’s Dirac Live menu and choose your slot (on Denon and Marantz: Setup Menu, Audio, Dirac Live, or the Option menu while playing).
- Filters are stored per input, so check the slot is selected on every input you use.
- Each filter carries its own speaker levels and distances. Don’t change them by hand afterwards, or you’ll undo part of the calibration.
Make more than one filter
You can use all three slots from one set of measurements. Go back to Filter Design, change the target curve or crossover, and export to an unused slot. A common set-up is one for films, one for music and one with a different bass level. Switching between them is the easiest way to compare.
Check it
- Listen to music and film you know well. Toggle Dirac off and on to compare.
- If the bass feels too heavy or too light, adjust the target curve rather than the receiver’s tone controls.
- For an objective check, measure the main seat in REW with the filter on and compare against your baseline from Step 6.
That’s a finished calibration. If something isn’t right, see Troubleshooting or the Dirac Help Centre.
Back to all Dirac Live steps
Common questions
The questions people ask most at this step, collected from a year of posts in Dirac user groups.
How many filters can I store, and how do I compare them?
Most receivers have 3 slots. Switch between them in the receiver’s Dirac menu (on Denon and Marantz, the Option menu while playing, or Setup Menu, Audio, Dirac Live). Export different versions to different slots and compare on the same material.
Source: Marantz: Dirac Live guide (PDF).
Will updating Dirac Live stop my old projects opening?
Projects from versions 2 and 3 open in the current app, as long as you’re signed in to your Dirac account. Projects from the old version 1 calibration tool don’t open, so keep a copy of that version if you rely on one.
How do I know if the result is good?
Read Reading Your Dirac Graphs, then measure the result in REW. Dirac’s Corrected line is a prediction; a measurement shows what actually happens at your seat.
Is Dirac on in Direct and Pure Direct?
Often not. Direct and Pure Direct modes are designed to bypass processing, and on Denon and Marantz the Dirac filter can’t be applied in them. Use Stereo or a surround mode to hear it, and check your manual for other brands.
Source: Denon AVR-X3800H manual.
Can I change channel levels after calibrating?
With Bass Management, Bass Control or ART, usually not: many receivers lock the levels and distances Dirac set while the filter is on (Denon and Marantz do). On other brands a small trim only moves that channel’s level, but it moves you away from what Dirac measured.
Source: Denon: Dirac Live manual.
You’re done
Check the result and fine-tune
Your calibration is done. Listen to material you know well first. If you want to see what changed, measure with REW. When you’re ready to tune further, every step in this guide has an Advanced section.
Things that catch people out
Advanced
- Changing the speaker layout can delete your Dirac filters, as it does on Denon and Marantz. Settle your layout first.
- Pure Direct and some listening modes bypass the filter, applying only the distances and levels. If Dirac seems to do nothing, check your sound mode.
- Some settings are locked while a Bass Control or ART filter is active, including distances, levels and crossovers, because Dirac calculated them.
- Overwriting a slot with an edited version of the same filter sometimes doesn’t apply the changes. Delete the filter first with the X in the Filter list (lower left of the app), then export again.
- If the connection drops during export, press BACK on the remote and restart the app.
Verifying with REW
Measure with the same mic position and REW settings as the baseline. Compare the two with the same smoothing (1/12 octave or psychoacoustic is a good start). Expect clear gains below about 300 Hz: smaller peaks, better filled dips where they aren’t cancellation nulls, and more even decay on a waterfall. A single-position measurement won’t match the target exactly, because Dirac optimises across the whole listening area rather than one point.
Fine-tuning imaging
Automatic correction aligns speakers for the microphone, not your ears. Some advanced users listen to mid-band pink noise through pairs of speakers (left and right, then left and centre, then centre and right) and make small distance adjustments until each phantom image is solid. Only do this with Room Correction filters, since Bass Control and ART lock these values.
Sources
- Denon: Dirac Live web manual (Configuring AVR settings, Measuring with Dirac Live software)
- Marantz: Dirac Live web manual
- Dirac Help Centre FAQ
- Dirac Live Guide (community, 2025), including StormAudio calibration advice