
Dirac measures at several microphone positions around your seat, not just one. The arrangement you choose tells Dirac how big your listening area is and how many positions to measure. This is the screen that causes the most confusion, so this step covers the awkward cases too: a seat against a wall, a main seat that isn’t in the middle of the sofa, and getting the mic height right.
The three arrangements
Beginner
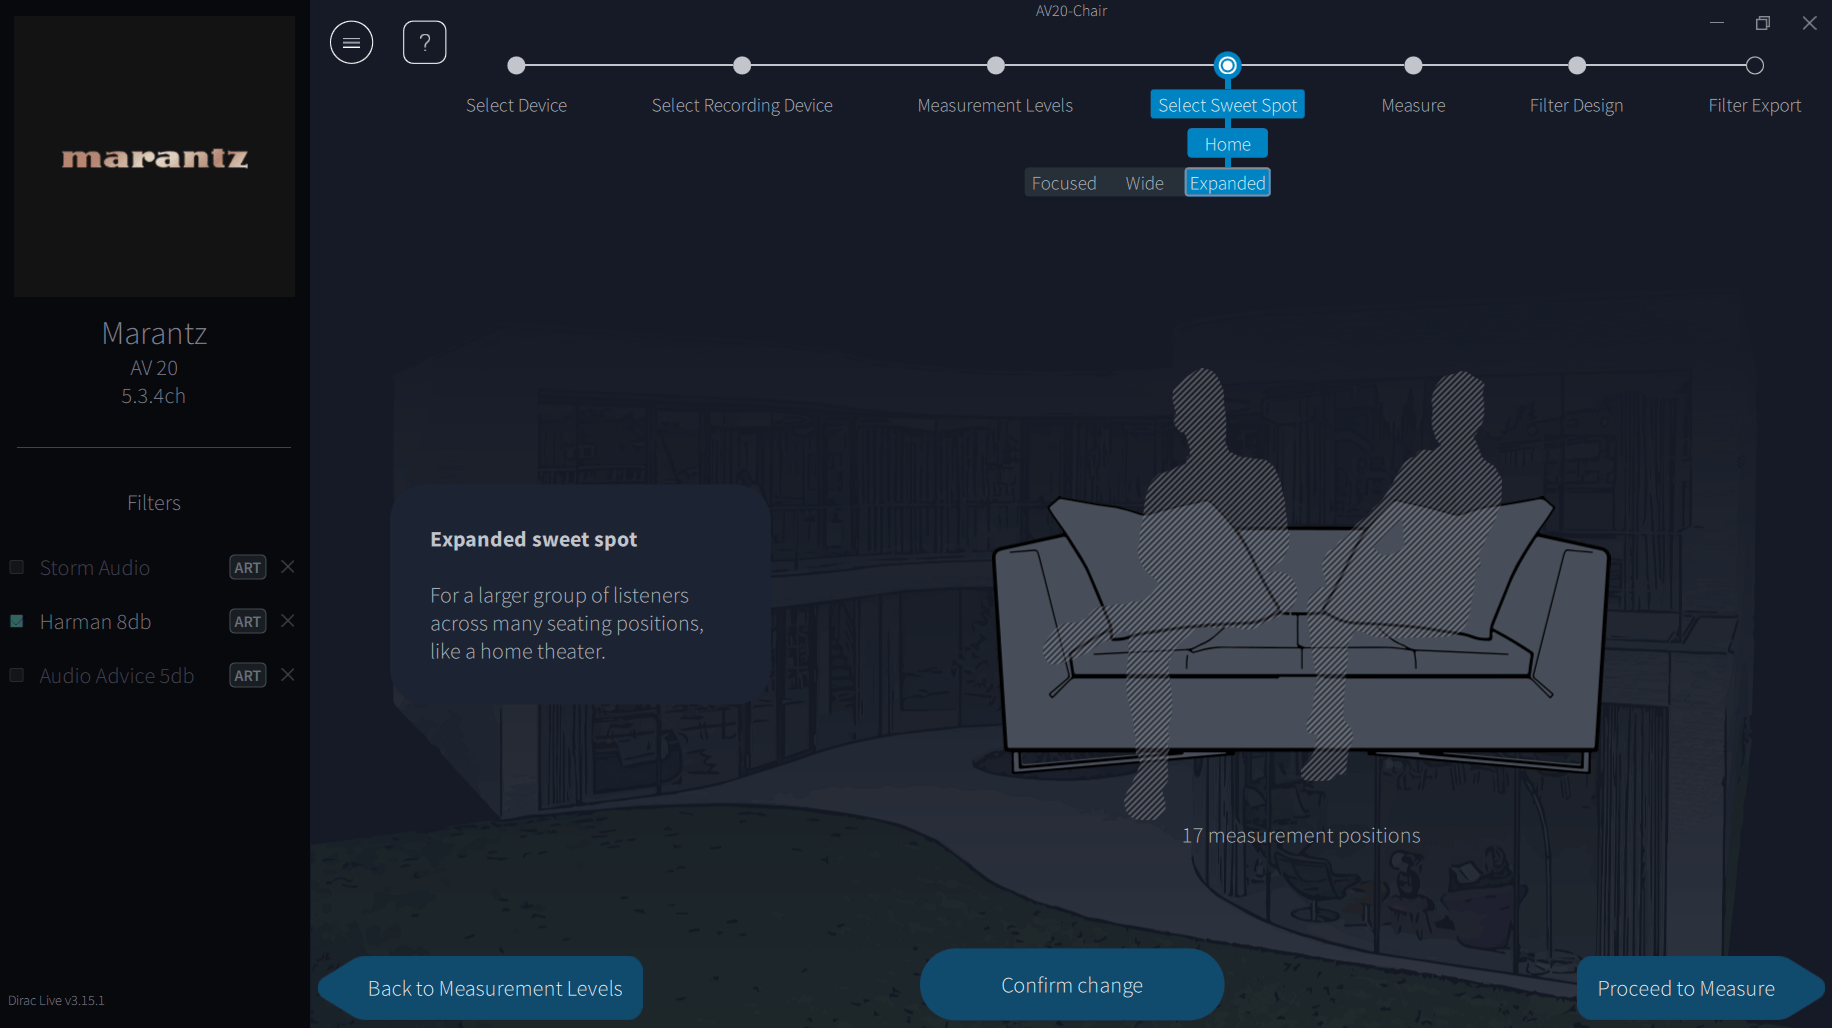
| Arrangement (Dirac Live 3.15) | Positions | Older name | Pick it if |
|---|---|---|---|
| Focused | 9 | Tightly Focused Imaging | One person in a dedicated seat. A single chair or the middle of a sofa you always sit in. |
| Wide | 13 | Focused Imaging | A small group close together, like a two or three-seat sofa. |
| Expanded | 17 | Wide Imaging | A large group across many seats, like a corner sofa or more than one row. |
Dirac renamed the arrangements in recent versions. Older guides, and the Denon and Marantz manual, use the older names in the third column. The positions are the same.
Denon and Marantz recommend the 17-position arrangement (Expanded, called Wide Imaging in their manual) if you have more than one row of seats or room for more than two people.


Which should you choose?
If you mostly listen alone from one seat, use Focused. If family watch films with you on one sofa, use Wide. Use Expanded only if you need several seats or rows to sound good, because correcting a bigger area means slightly less precise correction at the main seat.
The diagram is a guide, not a template
This is where most people go wrong. The positions drawn on the arrangement screen are suggestions. Dirac’s own training material says you may move away from them to suit your room, and that you can measure more densely around a seat you want to favour. What you must not change is the first position: it goes at your main seat, because Dirac sets every speaker’s level and timing from it.
- Position 1 is always your main seat, with the mic where the centre of your head would be.
- The other positions can go in any order, wherever your room allows.
- Every position must be able to “see” every speaker. Nothing solid between the mic and any speaker, including the back of the sofa.
- Stay inside the area where people actually sit.
Seat against a wall, main seat off to one side or a StormAudio processor? The layouts below cover these, and the Advanced section explains the reasoning and StormAudio’s approach in detail.
Get the height right
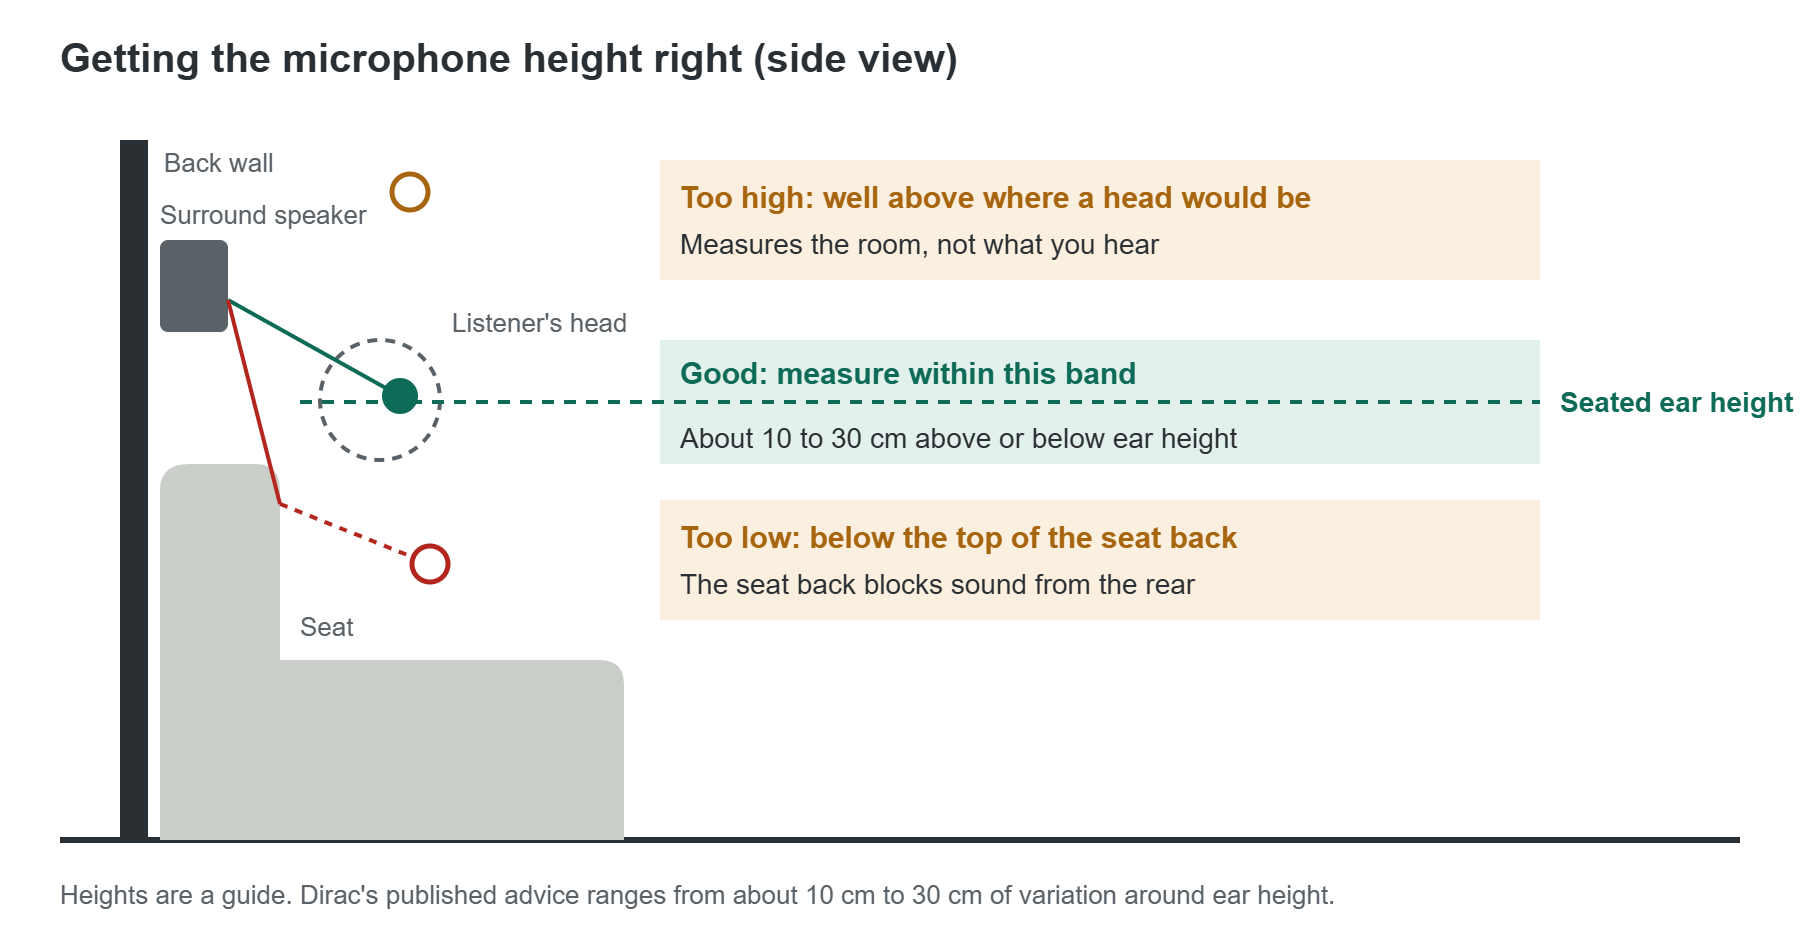
The arrangement screen draws positions at different heights, and it’s easy to overdo it. People end up with the mic down at cushion level or well above where anyone’s head would be. Keep every position close to seated ear height.
- Measure the height of your ears when you’re sitting normally. That’s your centre height for position 1.
- Move the mic up or down a little between the other positions. Dirac’s published advice ranges from about 10 cm to 30 cm either side of ear height. For most rooms, 10 to 20 cm is plenty.
- Never go below the top of the seat back. Below that, the seat back blocks sound from the rear speakers and Dirac corrects a problem you’ll never hear.
Seat or sofa against a wall
The arrangement diagram assumes you have space all round your head. If your seat is against the back wall, the positions behind your head would land inside the seat back or the wall. Don’t try to squeeze the mic in there.
- Keep position 1 exactly where your head is.
- Move the positions that would be behind your head forward, spreading them across the seat in front of and beside your head instead.
- Keep every position at least 20 to 25 cm from the others, and clear of the seat back and arms.
- Keep the same total number of positions. You’re moving them, not skipping them.

Main seat not in the middle of the sofa
Lots of people sit at one end of the sofa, or the sofa itself isn’t central to the screen. Dirac doesn’t need the main seat to be in the middle of anything. It needs position 1 to be where you actually sit.
- Put position 1 at your seat, not the middle of the sofa.
- Choose Wide (13 positions) if others use the sofa too.
- Put more positions around your own seat than the others. In the example below, 5 are around the main seat and 4 at each other seat.
- Spread the rest across the other seats so they still sound good.

StormAudio users
StormAudio processors use the same Dirac Live app, but StormAudio publishes its own guidance: the 9-position arrangement (Focused, or Tightly Focused in older versions), spread to their spacing rules. See the StormAudio approach in the Advanced section for the rules and a sofa layout.
Common questions
The questions people ask most at this step, collected from a year of posts in Dirac user groups.
I have more than one row of seats. Which arrangement?
Use the largest arrangement, Expanded (17 positions, called Wide Imaging in older versions). It spreads the positions widely enough to cover more than one row. If you use ART, Dirac asks for at least 9 positions anyway.
Do I have to measure every position the app shows?
Take all of them if you can. Each extra position gives Dirac more information about how the sound changes around your seats. ART won’t calculate with fewer than 3 valid measurements.
Why multiple positions
Advanced
A single measurement point captures the sound at one spot, including dips that exist only there. Correcting those makes things worse a few centimetres away. Measuring several points lets Dirac separate what’s consistent across the area (the speaker and the room’s broad behaviour, which it should correct) from what changes from point to point (local interference, which it should leave alone).
Spacing and number of points
Dirac’s guidance is consistent on the principles, though the exact figures vary by document:
- Spread positions over a volume at least 1 m across, even for the 9-position Focused arrangement. Too tight a cluster over-corrects and sounds dry and dull.
- Keep positions at least 30 cm apart (Dirac training guide). StormAudio’s minimum is 20 to 25 cm.
- Vary height. Dirac’s general guidance says up to 30 cm above and below the centre position. Its ART guidance suggests 10 to 20 cm.
- At least 9 positions for most setups, and don’t measure well outside the seating area.
Adapting the pattern to your room
Dirac’s training guide states that the arrangement positions are a guide and you can deviate to emphasise or de-emphasise particular spaces, and that with the larger arrangements you can measure more densely at one position to favour it. Dirac co-founder Mathias Johansson has described a rule of thumb of 3 measurements at the main seat and 2 at each other seat, covering wherever people sit.
That’s what the wall and off-centre layouts above do. Moving positions forward from a wall keeps the measured volume in the space your head actually occupies. Weighting positions towards an off-centre main seat tells Dirac which seat matters most, while the other positions stop the correction harming the rest of the sofa.
One caution for seats against a wall: bass builds up strongly near room boundaries. Measuring right against the wall would make Dirac see more bass than you hear with your head slightly forward, so keep positions clear of the seat back rather than pressed into it.
The StormAudio approach
StormAudio’s Dirac Live Basic Calibration video and its staff talks give a clear, repeatable method, built around a single main seat:
- Choose the 9-position arrangement: Focused in current versions, Tightly Focused in older ones.
- Take position 1 at the main seat with great care. At a 2024 Dirac tech talk, StormAudio’s Matthew Trinklein suggested a mic height about 10 cm above ear height, which he said most customers preferred. He also said the calibration is weighted mainly to the main seat.
- Don’t measure outside the listening area.
- Keep every position at least 20 to 25 cm from any other, and about 8 cm clear of armrests and the seat back.
- Don’t let any two positions share the same line across, front to back or in height. Staggering them gives Dirac a more complete picture of the space.
- Stay in the room during measurements, wearing ear plugs, rather than leaving and coming back.
- Trinklein also suggested around 6 positions spread around the seating area as an alternative.
The layout below applies those rules across a three-seat sofa against a wall. It’s our illustration of the rules, not StormAudio’s own drawing, and StormAudio note that rooms with complex acoustics may need a different pattern.

Mic height and the precedence effect
Raising the mic above ear height tilts the result slightly toward the ear-level speakers, because of how we localise sound from the first arrival. Some prefer this where height speakers are less capable or poorly placed. If your height speakers are good, stay at ear height.
Centring the main position
Imaging depends on the first position being truly central to you. A common advanced check is to measure the left and right speakers’ arrival times in REW and move the mic until they match, or to do a one-position Dirac calibration, export it and check the receiver shows equal left and right distances, then carry on with the full set.
Sources
- Dirac Live user manual (via manuals.plus): arrangements
- Dirac Live Training Guide, October 2020 (via Rotel): positions are a guide, spacing, 3D coverage
- miniDSP SHD manual, Dirac Live measurement guidance: first position, spread, height variation, line of sight
- NAD: How to perform Dirac Live calibration
- Denon: Dirac Live web manual
- Dirac: ART use case definition and setup guidelines
- StormAudio: Dirac Live Basic Calibration (video)
- Dirac Live Guide (community, 2025): StormAudio MWAVE 2024 tech talk notes, Mathias Johansson on measurement positions